Monday, June 3, 2013

There's No Place Like School

I thought that I'd share a few pics of my costume from fairy tale ball. I love The Wizard of Oz! Dressing up like Dorothy was so much fun, especially the shoes!


These are the ruby slippers I wore as part of my costume..  I'd been going back and forth about buying them for two years!  I am so glad that I did.

I used them to play a little trick on my kiddos. In the morning I wore black shoes with my costume. I told them that I really wished I had a pair of ruby slippers. Then while they were watching part of the movie I slipped behind my desk and switched my shoes. When I went back to the front of the room they noticed my shoes had changed. They were so excited. Why have a pair of ruby slippers if they don't create a little magic.


 A really sweet girl from a local theater company dressed as Cinderella came to our classroom and read Cinderella to us. All of the students had their pictures made with her. I loved her shoes and had to snap a picture.


I love this pic! Cinderella's glass slippers and Dorothy's ruby slippers. It's all about the shoes ladies.


One of my students had a wand. We took this picture. So cute!


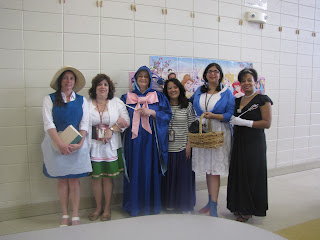
One of our kinder's grandmothers came to the ball dressed as Cinderella's fairy godmother. She took pictures with all 150 kindergartners! Then she posed with our teaching team.

We all had such a great day!


Friday, May 31, 2013

b,d,p,q


Wow it's been so long since I've posted. One of my bazillion goals for the summer is to try and write at least one post each week. I thought I'd start back with something quick and simple.

I've seen a lot of ideas for how to teach students to correctly identify lower case b & d and p&q.  I thought I would share an idea that I used with my class this year. It's pretty simple but it worked well.

One of the skills that we practice to prepare for testing is identifying which letter is different in a given set of letters. I noticed that when we looked at a set like  pqp or bdb that my students were not paying attention to the fact that the letters were facing different directions.  Instead of concentrating on the names of the letters or the sounds they made we started by focusing on the direction the letters were facing.

Each day during our morning warm up we looked at letter sets on the ActivBoard and circled the letter that was facing a different direction. Then we began connecting them to the letter names. We said that the letters were going different places. The b is headed to baseball in one direction and the d is going to the doctor in the other direction. The p is going to a party and the q is going to see the queen (one of my students came up with this one when I couldn't figure out where the q could be going).

Creating an awareness of the different directions that the letters face combined with daily practice really helped my kinders with b,d, p, & q.

Tuesday, January 31, 2012

Managing Extra Practice Work


I always like to have a go to activity for my students to use when they have completed their written assignments. I generally use a game and/or manipulatives-based activity for my math and literacy activities. However, there are other times (morning journals, Social Studies/Science Centers, etc...) when I need something for them to do if they finish early. I keep baskets of books on their tables for this purpose. However, last year I decided to add something more.

I wanted to make extra practice work available to my students. I generally make a couple of extra copies of the practice sheets we use during the week. I started collecting extra sheets after activities were completed. At the end of each week I began putting the extra pages into a tub. The tub was gold colored, so we began calling the extra work "Gold Tub Work."

Last year I just had my students take the extra practice pages home when they were finished. I began noticing that my students were not putting forth their best effort on this work, and I wasn't happy about sending home the ungraded papers. I knew that I needed a better way to manage this work and encourage my students to put forth more effort.

This past summer I watched  The "Pizza Papers" video on teachertipster.com. Mr. Smith puts extra practice pages into a basket. He has the students mark the pages with a "P" for Pizza Pages (I put a "G" on mine for Gold Tub) so they won't get confused with regular assignments. When the students finish the pages they put them into a pizza box. At the end of the month he pulls out a page. If the paper is done neatly and correctly the student wins a prize. I'm assuming that after he pulls a winner he discards the extra pages.

This was the idea I was looking for! I decided to start pulling my pages twice a week so my students would see the rewards quickly. I pull a page each Wednesday and Friday. I've used pencils, inexpensive toys, and bookmarks as prizes. I'm also working on some prizes that don't cost anything (lunch with a friend in another class, extra play time, an extra trip to the library, etc...). So far I have seen great results. Thanks Teacher Tipster!

Sunday, January 1, 2012

Magnetic Letter Activity


It's 2012! I thought I would begin the year by sharing a literacy activity I've been using in my class. This activity was really easy to put together and my students really enjoy it.

I am always looking for fun ways for students to practice making words during literacy centers. I like using colorful magnetic letters. It really seems to engage the students.

In the past I've had them use magnetic letters to make words that I'd written out on note cards. After making a  word with the magnetic letters they practice reading the word before making the next word.

This year I did something a little different. I got this idea from watching a video on Teachertipster.com. Mr. Smith used photographs of words made out of magnetic letters. He loaded the photographs onto a digital picture frame. This is a great go to activity. Students can practice words quietly once they've finished other assignments.

While I would like to do use this activity, I have yet to find a reasonably priced digital frame. However, I love the idea of using pictures of words made with magnetic letters. One day after school, I took photographs of words I made with magnetic letters.


I put the photographs into a word document and made cards. I printed the cards on white card stock. Then I laminated them using my Scotch laminator (I love having my own laminator!)

Magnetic Word Cards

After I laminated the cards I used used magnetic tape on the back.  The front of my desk faces a carpet, where one of my literacy centers is located.  My desk is metal so it provides an excellent surface for magnetic activities. I decided to use these cards as a follow up activity at this center. I placed the cards in a baggy and used a magnetic clip to attach the bag to the desk. I also stuck all the necessary magnetic letters to the desk.


My students select a card and stick it to the desk. Then they find the correct magnetic letters to make the word. Finally, they practice reading the word. This activity gives them practice at building words and blending.
After winter break I am going to add dry erase sentence strips to the activity, so they can practice writing the words and using them in sentences.

Saturday, November 26, 2011

A Quick Idea for Practicing Letters and Letter Sounds


I wanted to share this really easy idea for reviewing letters and letter sounds.

Each week I post a letter card with our focus letter on the door to our class bathroom. This gives the students an extra oppurtunity to see the letter throughout the day. It's really sweet to see them saying the letter name and sound before they enter the restroom.


This next part is so much fun! After the week is over, and I take the letter off of the bathroom door, I tack it up somewhere in the hallway. When we leave the room I tell the students to look for the letter. Since talking loudly in the hallway is a no-no, they are not allowed to say "I see it!" The rule is that they can point and say the sound that the letter makes.


I also post a letter outside our door. Each time they walk into the room they say the letter and it's sound.


The children really love this and I've noticed an improvement in some of my strugglers since I started doing this last month.

Saturday, October 22, 2011

1950's Number Matching Game

Each year our team celebrates the 50th day of school by learning about the 1950's. It's so much fun. I'll be doing several posts about our Fifties Day activities.

My students had fun with this number matching game. I cut apart the cards, and they had to match the number card with the picture card that had the same number of objects. I taught them how to play in small groups at my table, and will put it in a center next week.

Fifites Number Cards 1-10

Friday, October 21, 2011

Rock Science Mini Unit


I love to use rocks to teach the five senses. I know that you're probably thinking, "You can only teach 4 senses with rocks. You can't taste them!" If that's what your thinking then you're wrong! I'll get to the taste part later in this post.

I begin this mini-unit by reading the book "Everybody Needs A Rock." This book gives tips on finding the perfect rock. The tips encourage students to use many of their senses in their quest for a rock that is perfect for them.


After reading and discussing the book we go on a rock hunt.I give each student a plastic bag to put their rock in. I label the bag with their names. They have so much fun looking for their rocks. This year they found some really cool rocks.


When we come back inside from our rock hunt, the students draw a picture of their rock on the sheet below. They also finish the sentence "My rock is..." They have to choose a word to finish the sentence (we did this in late August, so I filled in the word for them), and they have to tell me which sense the word is associated with. For example if they choose brown they will tell me they used their sense of sight, and if they use smooth they have to tell me they used touch.
Rock Hunt Writing

I like to pull literature into my science activities. The story Sylvester and The Magic Pebble by William Steig goes well with this mini-unit. We talk about the ways that Sylvester's pebble is described, and what senses are used for those descriptions.


After we read the story I tell my students that I found some colorful pebbles, which I've put in a plastic bag. I tell them that we will be describing them with our five senses. They usually correct me by saying "Four senses Ms. Holzer. We're not going to taste them."

I pull one of the pebbles out of the bag. I hold it up and say "we're going to look at the pebble." Then I hit the pebble on the table, so it makes noise, and say "Then we're going to listen to the pebble." I run my fingers over the pebble, and say "We're going to feel the pebble." Next I hold the pebble up to my nose and say "We're going to smell the pebble." Finally, I hold the pebble up and say "Then we're going to taste the pebble." I then proceed to pop the pebble into my mouth and chew it up.


My students usually freak out. I get a lot of grossed out expressions. It is so funny.


Then I tell them that the rock was actually a chocolate candy, and they think it's hilarious. I give them each a bag of chocolate rocks to bring home. I tell them that their homework is to go through the five senses, and trick their family with the chocolate rock. They love this!

Before this year I hadn't done this activity for a few years. It's one of my favorites, but I had not been able to get to the store where I'd found the rocks. The realistic rocks are the heart of this activity.

 Last year a fifth grader, who I'd had in Kindergarten, was telling me that the rock activity had been one of her favorites. Not only did she remember the activity, but she could still remember exactly how I'd done it. This motivated me to go online and search for the chocolate rocks.

Amazingly, I discovered that they had them at my local Wal-Mart. Yay! I love Wal-mart.